

This achievement is hidden - Steam shows no description for it. We have not verified what unlocks it, so we are not going to guess: an invented trigger would waste your time. Check a community guide on the Steam page for this achievement, or add a community tip below if you unlock it - player-reported triggers are the most reliable source for Phasmophobia hidden achievements, which have historically been tied to secrets and easter eggs that updates move around.

Steam description: Spend $1.
Buy anything at all from the equipment shop in the lobby. This unlocks on your first purchase and will happen naturally on your first contract when you kit out a loadout.

Steam description: Complete 10 contracts.
Finish ten investigations. A contract counts as completed when you end it from the van - you do not have to identify the ghost correctly, so a run that goes badly still counts toward the total.

Steam description: Reach Prestige I.
Prestige is offered once you reach the level cap; taking it resets your level, money and equipment unlocks in exchange for a prestige rank and cosmetic rewards. Be deliberate about when you press it - anything you were mid-way through unlocking goes back to zero.

Steam description: Unlock all tier one equipment.
Equipment unlocks are tied to your level, and tier one items unlock early. Play contracts normally and the whole tier one set will unlock as you level - no specific purchase order is required.

This achievement is hidden - Steam shows no description for it. We have not verified what unlocks it, so we are not going to guess: an invented trigger would waste your time. Check a community guide on the Steam page for this achievement, or add a community tip below if you unlock it - player-reported triggers are the most reliable source for Phasmophobia hidden achievements, which have historically been tied to secrets and easter eggs that updates move around.

What the game asks: Successfully identify your first Shade and survive
Ghost-type achievements unlock the first time you correctly name a Shade on a contract and finish that contract alive.
- Read the in-game Journal first. The Journal lists the evidence types currently required for the Shade, and those combinations have been changed by updates over the game's life — trust the Journal in your build over any guide, including this one.
- Bring the gear that can prove those evidence types. Take a full loadout so you are not missing the one tool that would confirm it, and place the tripod camera and sound sensors early so passive evidence is being collected while you sweep the building.
- Find the ghost room before you hunt evidence. Thermometer and EMF sweeps narrow it down fast; once the room is known, drop everything there rather than carrying it around.
- Tick the evidence in the Journal as you confirm it, select "Shade", then leave and end the contract. The identification only counts if you survive.
Safety: hide before the hunt starts, not during it. Turn the lights off in the room you hide in, drop the sanity-draining tasks until the hunt ends, and keep a smudge stick for the moment you get caught in the open.
Playing on a lower difficulty with a longer setup phase is the safest way to farm the remaining ghost types — the identification counts on any difficulty.

What the game asks: Successfully identify your first Revenant and survive
Ghost-type achievements unlock the first time you correctly name a Revenant on a contract and finish that contract alive.
- Read the in-game Journal first. The Journal lists the evidence types currently required for the Revenant, and those combinations have been changed by updates over the game's life — trust the Journal in your build over any guide, including this one.
- Bring the gear that can prove those evidence types. Take a full loadout so you are not missing the one tool that would confirm it, and place the tripod camera and sound sensors early so passive evidence is being collected while you sweep the building.
- Find the ghost room before you hunt evidence. Thermometer and EMF sweeps narrow it down fast; once the room is known, drop everything there rather than carrying it around.
- Tick the evidence in the Journal as you confirm it, select "Revenant", then leave and end the contract. The identification only counts if you survive.
Safety: hide before the hunt starts, not during it. Turn the lights off in the room you hide in, drop the sanity-draining tasks until the hunt ends, and keep a smudge stick for the moment you get caught in the open.
Playing on a lower difficulty with a longer setup phase is the safest way to farm the remaining ghost types — the identification counts on any difficulty.

What the game asks: Successfully identify your first Banshee and survive
Ghost-type achievements unlock the first time you correctly name a Banshee on a contract and finish that contract alive.
- Read the in-game Journal first. The Journal lists the evidence types currently required for the Banshee, and those combinations have been changed by updates over the game's life — trust the Journal in your build over any guide, including this one.
- Bring the gear that can prove those evidence types. Take a full loadout so you are not missing the one tool that would confirm it, and place the tripod camera and sound sensors early so passive evidence is being collected while you sweep the building.
- Find the ghost room before you hunt evidence. Thermometer and EMF sweeps narrow it down fast; once the room is known, drop everything there rather than carrying it around.
- Tick the evidence in the Journal as you confirm it, select "Banshee", then leave and end the contract. The identification only counts if you survive.
Safety: hide before the hunt starts, not during it. Turn the lights off in the room you hide in, drop the sanity-draining tasks until the hunt ends, and keep a smudge stick for the moment you get caught in the open.
Playing on a lower difficulty with a longer setup phase is the safest way to farm the remaining ghost types — the identification counts on any difficulty.

What the game asks: Successfully identify your first Hantu and survive
Ghost-type achievements unlock the first time you correctly name a Hantu on a contract and finish that contract alive.
- Read the in-game Journal first. The Journal lists the evidence types currently required for the Hantu, and those combinations have been changed by updates over the game's life — trust the Journal in your build over any guide, including this one.
- Bring the gear that can prove those evidence types. Take a full loadout so you are not missing the one tool that would confirm it, and place the tripod camera and sound sensors early so passive evidence is being collected while you sweep the building.
- Find the ghost room before you hunt evidence. Thermometer and EMF sweeps narrow it down fast; once the room is known, drop everything there rather than carrying it around.
- Tick the evidence in the Journal as you confirm it, select "Hantu", then leave and end the contract. The identification only counts if you survive.
Safety: hide before the hunt starts, not during it. Turn the lights off in the room you hide in, drop the sanity-draining tasks until the hunt ends, and keep a smudge stick for the moment you get caught in the open.
Playing on a lower difficulty with a longer setup phase is the safest way to farm the remaining ghost types — the identification counts on any difficulty.

What the game asks: Successfully identify your first Oni and survive
Ghost-type achievements unlock the first time you correctly name a Oni on a contract and finish that contract alive.
- Read the in-game Journal first. The Journal lists the evidence types currently required for the Oni, and those combinations have been changed by updates over the game's life — trust the Journal in your build over any guide, including this one.
- Bring the gear that can prove those evidence types. Take a full loadout so you are not missing the one tool that would confirm it, and place the tripod camera and sound sensors early so passive evidence is being collected while you sweep the building.
- Find the ghost room before you hunt evidence. Thermometer and EMF sweeps narrow it down fast; once the room is known, drop everything there rather than carrying it around.
- Tick the evidence in the Journal as you confirm it, select "Oni", then leave and end the contract. The identification only counts if you survive.
Safety: hide before the hunt starts, not during it. Turn the lights off in the room you hide in, drop the sanity-draining tasks until the hunt ends, and keep a smudge stick for the moment you get caught in the open.
Playing on a lower difficulty with a longer setup phase is the safest way to farm the remaining ghost types — the identification counts on any difficulty.

What the game asks: Successfully identify your first Spirit and survive
Ghost-type achievements unlock the first time you correctly name a Spirit on a contract and finish that contract alive.
- Read the in-game Journal first. The Journal lists the evidence types currently required for the Spirit, and those combinations have been changed by updates over the game's life — trust the Journal in your build over any guide, including this one.
- Bring the gear that can prove those evidence types. Take a full loadout so you are not missing the one tool that would confirm it, and place the tripod camera and sound sensors early so passive evidence is being collected while you sweep the building.
- Find the ghost room before you hunt evidence. Thermometer and EMF sweeps narrow it down fast; once the room is known, drop everything there rather than carrying it around.
- Tick the evidence in the Journal as you confirm it, select "Spirit", then leave and end the contract. The identification only counts if you survive.
Safety: hide before the hunt starts, not during it. Turn the lights off in the room you hide in, drop the sanity-draining tasks until the hunt ends, and keep a smudge stick for the moment you get caught in the open.
Playing on a lower difficulty with a longer setup phase is the safest way to farm the remaining ghost types — the identification counts on any difficulty.

What the game asks: Successfully identify your first Wraith and survive
Ghost-type achievements unlock the first time you correctly name a Wraith on a contract and finish that contract alive.
- Read the in-game Journal first. The Journal lists the evidence types currently required for the Wraith, and those combinations have been changed by updates over the game's life — trust the Journal in your build over any guide, including this one.
- Bring the gear that can prove those evidence types. Take a full loadout so you are not missing the one tool that would confirm it, and place the tripod camera and sound sensors early so passive evidence is being collected while you sweep the building.
- Find the ghost room before you hunt evidence. Thermometer and EMF sweeps narrow it down fast; once the room is known, drop everything there rather than carrying it around.
- Tick the evidence in the Journal as you confirm it, select "Wraith", then leave and end the contract. The identification only counts if you survive.
Safety: hide before the hunt starts, not during it. Turn the lights off in the room you hide in, drop the sanity-draining tasks until the hunt ends, and keep a smudge stick for the moment you get caught in the open.
Playing on a lower difficulty with a longer setup phase is the safest way to farm the remaining ghost types — the identification counts on any difficulty.

What the game asks: Successfully identify your first Obake and survive
Ghost-type achievements unlock the first time you correctly name a Obake on a contract and finish that contract alive.
- Read the in-game Journal first. The Journal lists the evidence types currently required for the Obake, and those combinations have been changed by updates over the game's life — trust the Journal in your build over any guide, including this one.
- Bring the gear that can prove those evidence types. Take a full loadout so you are not missing the one tool that would confirm it, and place the tripod camera and sound sensors early so passive evidence is being collected while you sweep the building.
- Find the ghost room before you hunt evidence. Thermometer and EMF sweeps narrow it down fast; once the room is known, drop everything there rather than carrying it around.
- Tick the evidence in the Journal as you confirm it, select "Obake", then leave and end the contract. The identification only counts if you survive.
Safety: hide before the hunt starts, not during it. Turn the lights off in the room you hide in, drop the sanity-draining tasks until the hunt ends, and keep a smudge stick for the moment you get caught in the open.
Playing on a lower difficulty with a longer setup phase is the safest way to farm the remaining ghost types — the identification counts on any difficulty.

What the game asks: Successfully identify your first Yurei and survive
Ghost-type achievements unlock the first time you correctly name a Yurei on a contract and finish that contract alive.
- Read the in-game Journal first. The Journal lists the evidence types currently required for the Yurei, and those combinations have been changed by updates over the game's life — trust the Journal in your build over any guide, including this one.
- Bring the gear that can prove those evidence types. Take a full loadout so you are not missing the one tool that would confirm it, and place the tripod camera and sound sensors early so passive evidence is being collected while you sweep the building.
- Find the ghost room before you hunt evidence. Thermometer and EMF sweeps narrow it down fast; once the room is known, drop everything there rather than carrying it around.
- Tick the evidence in the Journal as you confirm it, select "Yurei", then leave and end the contract. The identification only counts if you survive.
Safety: hide before the hunt starts, not during it. Turn the lights off in the room you hide in, drop the sanity-draining tasks until the hunt ends, and keep a smudge stick for the moment you get caught in the open.
Playing on a lower difficulty with a longer setup phase is the safest way to farm the remaining ghost types — the identification counts on any difficulty.

What the game asks: Successfully identify your first Thaye and survive
Ghost-type achievements unlock the first time you correctly name a Thaye on a contract and finish that contract alive.
- Read the in-game Journal first. The Journal lists the evidence types currently required for the Thaye, and those combinations have been changed by updates over the game's life — trust the Journal in your build over any guide, including this one.
- Bring the gear that can prove those evidence types. Take a full loadout so you are not missing the one tool that would confirm it, and place the tripod camera and sound sensors early so passive evidence is being collected while you sweep the building.
- Find the ghost room before you hunt evidence. Thermometer and EMF sweeps narrow it down fast; once the room is known, drop everything there rather than carrying it around.
- Tick the evidence in the Journal as you confirm it, select "Thaye", then leave and end the contract. The identification only counts if you survive.
Safety: hide before the hunt starts, not during it. Turn the lights off in the room you hide in, drop the sanity-draining tasks until the hunt ends, and keep a smudge stick for the moment you get caught in the open.
Playing on a lower difficulty with a longer setup phase is the safest way to farm the remaining ghost types — the identification counts on any difficulty.

What the game asks: Successfully identify your first Poltergeist and survive
Ghost-type achievements unlock the first time you correctly name a Poltergeist on a contract and finish that contract alive.
- Read the in-game Journal first. The Journal lists the evidence types currently required for the Poltergeist, and those combinations have been changed by updates over the game's life — trust the Journal in your build over any guide, including this one.
- Bring the gear that can prove those evidence types. Take a full loadout so you are not missing the one tool that would confirm it, and place the tripod camera and sound sensors early so passive evidence is being collected while you sweep the building.
- Find the ghost room before you hunt evidence. Thermometer and EMF sweeps narrow it down fast; once the room is known, drop everything there rather than carrying it around.
- Tick the evidence in the Journal as you confirm it, select "Poltergeist", then leave and end the contract. The identification only counts if you survive.
Safety: hide before the hunt starts, not during it. Turn the lights off in the room you hide in, drop the sanity-draining tasks until the hunt ends, and keep a smudge stick for the moment you get caught in the open.
Playing on a lower difficulty with a longer setup phase is the safest way to farm the remaining ghost types — the identification counts on any difficulty.

What the game asks: Successfully identify your first Myling and survive
Ghost-type achievements unlock the first time you correctly name a Myling on a contract and finish that contract alive.
- Read the in-game Journal first. The Journal lists the evidence types currently required for the Myling, and those combinations have been changed by updates over the game's life — trust the Journal in your build over any guide, including this one.
- Bring the gear that can prove those evidence types. Take a full loadout so you are not missing the one tool that would confirm it, and place the tripod camera and sound sensors early so passive evidence is being collected while you sweep the building.
- Find the ghost room before you hunt evidence. Thermometer and EMF sweeps narrow it down fast; once the room is known, drop everything there rather than carrying it around.
- Tick the evidence in the Journal as you confirm it, select "Myling", then leave and end the contract. The identification only counts if you survive.
Safety: hide before the hunt starts, not during it. Turn the lights off in the room you hide in, drop the sanity-draining tasks until the hunt ends, and keep a smudge stick for the moment you get caught in the open.
Playing on a lower difficulty with a longer setup phase is the safest way to farm the remaining ghost types — the identification counts on any difficulty.

What the game asks: Successfully identify your first Phantom and survive
Ghost-type achievements unlock the first time you correctly name a Phantom on a contract and finish that contract alive.
- Read the in-game Journal first. The Journal lists the evidence types currently required for the Phantom, and those combinations have been changed by updates over the game's life — trust the Journal in your build over any guide, including this one.
- Bring the gear that can prove those evidence types. Take a full loadout so you are not missing the one tool that would confirm it, and place the tripod camera and sound sensors early so passive evidence is being collected while you sweep the building.
- Find the ghost room before you hunt evidence. Thermometer and EMF sweeps narrow it down fast; once the room is known, drop everything there rather than carrying it around.
- Tick the evidence in the Journal as you confirm it, select "Phantom", then leave and end the contract. The identification only counts if you survive.
Safety: hide before the hunt starts, not during it. Turn the lights off in the room you hide in, drop the sanity-draining tasks until the hunt ends, and keep a smudge stick for the moment you get caught in the open.
Playing on a lower difficulty with a longer setup phase is the safest way to farm the remaining ghost types — the identification counts on any difficulty.

Steam description: Spend $10,000.
Cumulative across your whole save - every piece of equipment you buy counts toward the total. You do not need to spend it in one go and you do not need to hold $10,000 at once. Buying consumables such as smudge sticks, candles and batteries between contracts is the fastest way to tick this along while you play normally.

What the game asks: Successfully identify your first Mare and survive
Ghost-type achievements unlock the first time you correctly name a Mare on a contract and finish that contract alive.
- Read the in-game Journal first. The Journal lists the evidence types currently required for the Mare, and those combinations have been changed by updates over the game's life — trust the Journal in your build over any guide, including this one.
- Bring the gear that can prove those evidence types. Take a full loadout so you are not missing the one tool that would confirm it, and place the tripod camera and sound sensors early so passive evidence is being collected while you sweep the building.
- Find the ghost room before you hunt evidence. Thermometer and EMF sweeps narrow it down fast; once the room is known, drop everything there rather than carrying it around.
- Tick the evidence in the Journal as you confirm it, select "Mare", then leave and end the contract. The identification only counts if you survive.
Safety: hide before the hunt starts, not during it. Turn the lights off in the room you hide in, drop the sanity-draining tasks until the hunt ends, and keep a smudge stick for the moment you get caught in the open.
Playing on a lower difficulty with a longer setup phase is the safest way to farm the remaining ghost types — the identification counts on any difficulty.

What the game asks: Successfully identify The Twins for the first time
Ghost-type achievements unlock the first time you correctly name a The Twins on a contract and finish that contract alive.
- Read the in-game Journal first. The Journal lists the evidence types currently required for the The Twins, and those combinations have been changed by updates over the game's life — trust the Journal in your build over any guide, including this one.
- Bring the gear that can prove those evidence types. Take a full loadout so you are not missing the one tool that would confirm it, and place the tripod camera and sound sensors early so passive evidence is being collected while you sweep the building.
- Find the ghost room before you hunt evidence. Thermometer and EMF sweeps narrow it down fast; once the room is known, drop everything there rather than carrying it around.
- Tick the evidence in the Journal as you confirm it, select "The Twins", then leave and end the contract. The identification only counts if you survive.
Safety: hide before the hunt starts, not during it. Turn the lights off in the room you hide in, drop the sanity-draining tasks until the hunt ends, and keep a smudge stick for the moment you get caught in the open.
Playing on a lower difficulty with a longer setup phase is the safest way to farm the remaining ghost types — the identification counts on any difficulty.

What the game asks: Successfully identify your first Raiju and survive
Ghost-type achievements unlock the first time you correctly name a Raiju on a contract and finish that contract alive.
- Read the in-game Journal first. The Journal lists the evidence types currently required for the Raiju, and those combinations have been changed by updates over the game's life — trust the Journal in your build over any guide, including this one.
- Bring the gear that can prove those evidence types. Take a full loadout so you are not missing the one tool that would confirm it, and place the tripod camera and sound sensors early so passive evidence is being collected while you sweep the building.
- Find the ghost room before you hunt evidence. Thermometer and EMF sweeps narrow it down fast; once the room is known, drop everything there rather than carrying it around.
- Tick the evidence in the Journal as you confirm it, select "Raiju", then leave and end the contract. The identification only counts if you survive.
Safety: hide before the hunt starts, not during it. Turn the lights off in the room you hide in, drop the sanity-draining tasks until the hunt ends, and keep a smudge stick for the moment you get caught in the open.
Playing on a lower difficulty with a longer setup phase is the safest way to farm the remaining ghost types — the identification counts on any difficulty.

What the game asks: Successfully identify your first Jinn and survive
Ghost-type achievements unlock the first time you correctly name a Jinn on a contract and finish that contract alive.
- Read the in-game Journal first. The Journal lists the evidence types currently required for the Jinn, and those combinations have been changed by updates over the game's life — trust the Journal in your build over any guide, including this one.
- Bring the gear that can prove those evidence types. Take a full loadout so you are not missing the one tool that would confirm it, and place the tripod camera and sound sensors early so passive evidence is being collected while you sweep the building.
- Find the ghost room before you hunt evidence. Thermometer and EMF sweeps narrow it down fast; once the room is known, drop everything there rather than carrying it around.
- Tick the evidence in the Journal as you confirm it, select "Jinn", then leave and end the contract. The identification only counts if you survive.
Safety: hide before the hunt starts, not during it. Turn the lights off in the room you hide in, drop the sanity-draining tasks until the hunt ends, and keep a smudge stick for the moment you get caught in the open.
Playing on a lower difficulty with a longer setup phase is the safest way to farm the remaining ghost types — the identification counts on any difficulty.

What the game asks: Successfully identify your first Yokai and survive
Ghost-type achievements unlock the first time you correctly name a Yokai on a contract and finish that contract alive.
- Read the in-game Journal first. The Journal lists the evidence types currently required for the Yokai, and those combinations have been changed by updates over the game's life — trust the Journal in your build over any guide, including this one.
- Bring the gear that can prove those evidence types. Take a full loadout so you are not missing the one tool that would confirm it, and place the tripod camera and sound sensors early so passive evidence is being collected while you sweep the building.
- Find the ghost room before you hunt evidence. Thermometer and EMF sweeps narrow it down fast; once the room is known, drop everything there rather than carrying it around.
- Tick the evidence in the Journal as you confirm it, select "Yokai", then leave and end the contract. The identification only counts if you survive.
Safety: hide before the hunt starts, not during it. Turn the lights off in the room you hide in, drop the sanity-draining tasks until the hunt ends, and keep a smudge stick for the moment you get caught in the open.
Playing on a lower difficulty with a longer setup phase is the safest way to farm the remaining ghost types — the identification counts on any difficulty.

What the game asks: Successfully identify your first Moroi and survive
Ghost-type achievements unlock the first time you correctly name a Moroi on a contract and finish that contract alive.
- Read the in-game Journal first. The Journal lists the evidence types currently required for the Moroi, and those combinations have been changed by updates over the game's life — trust the Journal in your build over any guide, including this one.
- Bring the gear that can prove those evidence types. Take a full loadout so you are not missing the one tool that would confirm it, and place the tripod camera and sound sensors early so passive evidence is being collected while you sweep the building.
- Find the ghost room before you hunt evidence. Thermometer and EMF sweeps narrow it down fast; once the room is known, drop everything there rather than carrying it around.
- Tick the evidence in the Journal as you confirm it, select "Moroi", then leave and end the contract. The identification only counts if you survive.
Safety: hide before the hunt starts, not during it. Turn the lights off in the room you hide in, drop the sanity-draining tasks until the hunt ends, and keep a smudge stick for the moment you get caught in the open.
Playing on a lower difficulty with a longer setup phase is the safest way to farm the remaining ghost types — the identification counts on any difficulty.

What the game asks: Successfully identify your first Onryo and survive
Ghost-type achievements unlock the first time you correctly name a Onryo on a contract and finish that contract alive.
- Read the in-game Journal first. The Journal lists the evidence types currently required for the Onryo, and those combinations have been changed by updates over the game's life — trust the Journal in your build over any guide, including this one.
- Bring the gear that can prove those evidence types. Take a full loadout so you are not missing the one tool that would confirm it, and place the tripod camera and sound sensors early so passive evidence is being collected while you sweep the building.
- Find the ghost room before you hunt evidence. Thermometer and EMF sweeps narrow it down fast; once the room is known, drop everything there rather than carrying it around.
- Tick the evidence in the Journal as you confirm it, select "Onryo", then leave and end the contract. The identification only counts if you survive.
Safety: hide before the hunt starts, not during it. Turn the lights off in the room you hide in, drop the sanity-draining tasks until the hunt ends, and keep a smudge stick for the moment you get caught in the open.
Playing on a lower difficulty with a longer setup phase is the safest way to farm the remaining ghost types — the identification counts on any difficulty.

What the game asks: Successfully identify your first Goryo and survive
Ghost-type achievements unlock the first time you correctly name a Goryo on a contract and finish that contract alive.
- Read the in-game Journal first. The Journal lists the evidence types currently required for the Goryo, and those combinations have been changed by updates over the game's life — trust the Journal in your build over any guide, including this one.
- Bring the gear that can prove those evidence types. Take a full loadout so you are not missing the one tool that would confirm it, and place the tripod camera and sound sensors early so passive evidence is being collected while you sweep the building.
- Find the ghost room before you hunt evidence. Thermometer and EMF sweeps narrow it down fast; once the room is known, drop everything there rather than carrying it around.
- Tick the evidence in the Journal as you confirm it, select "Goryo", then leave and end the contract. The identification only counts if you survive.
Safety: hide before the hunt starts, not during it. Turn the lights off in the room you hide in, drop the sanity-draining tasks until the hunt ends, and keep a smudge stick for the moment you get caught in the open.
Playing on a lower difficulty with a longer setup phase is the safest way to farm the remaining ghost types — the identification counts on any difficulty.
Steam description: Complete 50 optional objectives.
Each contract lists optional objectives on the van whiteboard alongside the main one. They are cumulative across contracts, so aim to clear all of the listed optionals on every run rather than leaving as soon as you have identified the ghost - it also raises your payout, which feeds the spending achievements at the same time.

What the game asks: Successfully identify your first Demon and survive
Ghost-type achievements unlock the first time you correctly name a Demon on a contract and finish that contract alive.
- Read the in-game Journal first. The Journal lists the evidence types currently required for the Demon, and those combinations have been changed by updates over the game's life — trust the Journal in your build over any guide, including this one.
- Bring the gear that can prove those evidence types. Take a full loadout so you are not missing the one tool that would confirm it, and place the tripod camera and sound sensors early so passive evidence is being collected while you sweep the building.
- Find the ghost room before you hunt evidence. Thermometer and EMF sweeps narrow it down fast; once the room is known, drop everything there rather than carrying it around.
- Tick the evidence in the Journal as you confirm it, select "Demon", then leave and end the contract. The identification only counts if you survive.
Safety: hide before the hunt starts, not during it. Turn the lights off in the room you hide in, drop the sanity-draining tasks until the hunt ends, and keep a smudge stick for the moment you get caught in the open.
Playing on a lower difficulty with a longer setup phase is the safest way to farm the remaining ghost types — the identification counts on any difficulty.

This achievement is hidden - Steam shows no description for it. We have not verified what unlocks it, so we are not going to guess: an invented trigger would waste your time. Check a community guide on the Steam page for this achievement, or add a community tip below if you unlock it - player-reported triggers are the most reliable source for Phasmophobia hidden achievements, which have historically been tied to secrets and easter eggs that updates move around.

What the game asks: Successfully identify The Mimic for the first time
Ghost-type achievements unlock the first time you correctly name a The Mimic on a contract and finish that contract alive.
- Read the in-game Journal first. The Journal lists the evidence types currently required for the The Mimic, and those combinations have been changed by updates over the game's life — trust the Journal in your build over any guide, including this one.
- Bring the gear that can prove those evidence types. Take a full loadout so you are not missing the one tool that would confirm it, and place the tripod camera and sound sensors early so passive evidence is being collected while you sweep the building.
- Find the ghost room before you hunt evidence. Thermometer and EMF sweeps narrow it down fast; once the room is known, drop everything there rather than carrying it around.
- Tick the evidence in the Journal as you confirm it, select "The Mimic", then leave and end the contract. The identification only counts if you survive.
Safety: hide before the hunt starts, not during it. Turn the lights off in the room you hide in, drop the sanity-draining tasks until the hunt ends, and keep a smudge stick for the moment you get caught in the open.
Playing on a lower difficulty with a longer setup phase is the safest way to farm the remaining ghost types — the identification counts on any difficulty.

What the game asks: Successfully identify your first Deogen and survive
Ghost-type achievements unlock the first time you correctly name a Deogen on a contract and finish that contract alive.
- Read the in-game Journal first. The Journal lists the evidence types currently required for the Deogen, and those combinations have been changed by updates over the game's life — trust the Journal in your build over any guide, including this one.
- Bring the gear that can prove those evidence types. Take a full loadout so you are not missing the one tool that would confirm it, and place the tripod camera and sound sensors early so passive evidence is being collected while you sweep the building.
- Find the ghost room before you hunt evidence. Thermometer and EMF sweeps narrow it down fast; once the room is known, drop everything there rather than carrying it around.
- Tick the evidence in the Journal as you confirm it, select "Deogen", then leave and end the contract. The identification only counts if you survive.
Safety: hide before the hunt starts, not during it. Turn the lights off in the room you hide in, drop the sanity-draining tasks until the hunt ends, and keep a smudge stick for the moment you get caught in the open.
Playing on a lower difficulty with a longer setup phase is the safest way to farm the remaining ghost types — the identification counts on any difficulty.

This achievement is hidden - Steam shows no description for it. We have not verified what unlocks it, so we are not going to guess: an invented trigger would waste your time. Check a community guide on the Steam page for this achievement, or add a community tip below if you unlock it - player-reported triggers are the most reliable source for Phasmophobia hidden achievements, which have historically been tied to secrets and easter eggs that updates move around.

Steam description: Complete 50 contracts.
The middle step of the contract-count chain. Short maps finished quickly count the same as long ones, so if you are only chasing the number, the smallest map on a low difficulty is the fastest loop.

Steam description: Complete 30 daily tasks.
Daily tasks are listed in the lobby and refresh each day, so this is gated by real-world time rather than skill. Checking the board and clearing the day's tasks whenever you sit down to play is all that is required.

Steam description: Spend $50,000.
A continuation of Chump Change and Fat Stack - the counter is lifetime spending, not money held. Running higher-difficulty contracts pays better, which in turn lets you buy more, so pushing the difficulty up is the fastest route once you are comfortable surviving.

Steam description: Create a custom difficulty.
At the contract board, choose the custom difficulty option and set up your own ruleset. Creating it is enough - you do not need to complete a contract on it for the achievement.

Steam description: Complete a weekly challenge mode.
The challenge mode is selected from the lobby and uses a fixed map, loadout and ruleset that rotates each week. You need to finish the contract, so read the restrictions before you go in - some weeks remove equipment you would normally rely on.

Steam description: Complete 100 contracts.
The final step of the contract-count chain. This one takes care of itself if you are also working toward Prestige, since prestige progression requires a large amount of play anyway.

Steam description: Spend $100,000.
The top tier of the spending chain. This is a long-haul total that most players finish somewhere on the way to their first prestige. Optional objectives and photo rewards raise your payout per contract considerably, so completing objectives rather than rushing the ID is the efficient path.

Steam description: Unlock all tier two equipment.
The second unlock tier. Levelling is the only requirement - higher-difficulty contracts award more experience per run, so raising the difficulty once you can survive reliably is the fastest route.
This achievement is hidden - Steam shows no description for it. We have not verified what unlocks it, so we are not going to guess: an invented trigger would waste your time. Check a community guide on the Steam page for this achievement, or add a community tip below if you unlock it - player-reported triggers are the most reliable source for Phasmophobia hidden achievements, which have historically been tied to secrets and easter eggs that updates move around.

Steam description: Complete Training.
Run the Training contract from the lobby whiteboard and follow it through to the end. It walks you through the van, the equipment board and a basic investigation loop. Do this first even if you have played before - it is the cheapest achievement in the game and it unlocks nothing you would lose by skipping the tutorial.

Steam description: Unlock all tier three equipment.
The final unlock tier and a substantial levelling grind. Note that prestiging resets your level and your unlocks, so if you are chasing this alongside the Prestige achievements, unlock the full tier three set before you prestige rather than after.

Steam description: Complete 10 weekly tasks.
Like Dedicated but on the weekly board - a real-time gate rather than a difficulty one. Ten separate weeks of clearing the weekly task list.

Steam description: Complete the weekly challenge mode 5 times.
A continuation of Challenger Approaching. Gated by the weekly rotation.

Steam description: Reach Prestige II.
A second full run to the level cap after your first prestige reset.
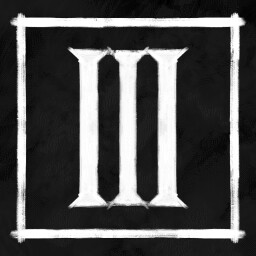
Steam description: Reach Prestige III.
A third full climb to the level cap. This is one of the longest commitments in the game and is almost always the last non-hidden achievement players finish.

This achievement is hidden - Steam shows no description for it. We have not verified what unlocks it, so we are not going to guess: an invented trigger would waste your time. Check a community guide on the Steam page for this achievement, or add a community tip below if you unlock it - player-reported triggers are the most reliable source for Phasmophobia hidden achievements, which have historically been tied to secrets and easter eggs that updates move around.
Steam description: Complete the weekly challenge mode 10 times.
The top tier of the challenge-mode chain and one of the longest real-time gates in the game.

Steam description: Obtain the Bronze Apocalypse Trophy.
The Apocalypse trophies are awarded for clearing the Apocalypse challenge conditions in-game. The exact conditions for each trophy tier are described in-game and have been adjusted by updates - check the current requirements in your build rather than relying on an older guide. Bronze is the entry tier of the three.

Steam description: Obtain the Silver Apocalypse Trophy.
The middle Apocalypse trophy tier. As with Bronze, read the current in-game conditions - they have changed across updates and we have not verified the exact requirements for your build here.

Steam description: Obtain the Gold Apocalypse Trophy.
The hardest Apocalypse trophy tier and one of the toughest achievements in the game. Check the current in-game conditions for the Gold trophy - they have been adjusted by updates and are not verified here.